If you want to register your business in the UK, then you have come to the right place, as we will be discussing the Best UK Business Formation Companies.
In this article, you will also learn many things about company formation in the UK and what is required of you at each point in time.
Ultimately, you will be able to register your own business in the UK no matter where you are currently located in the world.
Also, as a registered business owner in the UK, you'll be able to open a verified stripe account, PayPal Business account, etc.
So, before we proceed, here are my top recommended company registration agencies in the UK:
Icon Offices
Founded in 2016 and has Registered over 100,000 Businesses in the UK.
- Free UK LTD Company Formation
- Free Business Bank Accounts for UK & Non-UK residents with up to £250 Cash Reward
- Choose from 6 prestigious office addresses for your company
- VoIP UK Landline & Mobile Number Available
- Free Gifts worth £500 including domains, vouchers, etc.
Your Company Formations
Founded in 2014 and has Registered over 200,000 Businesses in the UK.
- UK Company Formation.
- Free .co.uk Domain Name.
- Registered Address, London EC1
- Directors Address, London EC1.
- Printed Share Certificates.
- Bank Accounts with up to £155 Cash Back.
- You get a Free Accountancy Consultation.
1st formations
Founded in 2014 and has Registered over 1,000,000 Businesses in the UK.
- UK Company Formation
- FREE Business Bank Account.
- Free .com or .co.uk Domain Name.
- You get a London Registered Office Address FREE for 12 months.
- London Business Address Service FREE for 12 months.
- Full Company Secretary Service FREE for 12 months.
It's important to note that anyone from anywhere in the world can actually register their business in the UK without being a UK resident.
So, to make sure that your have the best options, I have reviewed the best UK Business Formations Companies for you to make your choice.
Best UK Business Formation Companies

Your Company Formations
Your Company Formations is the UK’s leading award winning company formation agent that helps businesses worldwide register in the UK with ease and professionalism.
Founded in 2014 and have helped over 200,000+ businesses become fully registered in the UK.
Icon Offices
Icon Offices, a leading business registration platform, helps businesses worldwide register in the UK with ease and professionalism.
Founded in 2016 and have helped over 100,000+ businesses become fully registered in the UK.
1st Formations
Founded in 2014, 1st Formations have Registered over 1,000,000 Businesses in the UK.
They also offer competitive price and services which makes them one of the leaders in the industry.

Rapid Formations
Founded in 1999, Rapid Formations have Registered over 1,000,000 Businesses in the UK as well.
They are very much active for the best business formation service provider in the UK, making them one of the leaders in the industry.

IncorpUK
Founded in 2020, IncorpUK is fast growing with over 10,000+ Registered Businesses in the UK.
IncorpUK makes it possible for both residents and non-UK residents to register their business in the UK.
Their pricing seems to be way less that other alternatives, so you can try them out.
Why Register Your Business in the UK?
- Legal Compliance: Registering your business is a legal requirement in the UK. It ensures compliance with government regulations and provides a clear structure for operating your company.
- Credibility and Trust: A registered business establishes credibility with customers, suppliers, and investors. It signals professionalism and commitment to your venture.
- Access to Funding and Benefits: Business registration opens doors to funding opportunities, tax benefits, and the ability to hire employees.
Types of Entities That Can Be Formed in the UK
Choosing the right type of business entity is a crucial step in the registration process. Here are the primary types of entities that can be formed in the UK:
1. Private Limited Company (Ltd)
A private limited company is the most common business structure in the UK. It provides limited liability protection, meaning the personal assets of shareholders are protected in case of business debts.
Key features include:
- Separate Legal Entity: The company is distinct from its owners, allowing it to own assets, enter contracts, and sue or be sued.
- Limited Liability: Shareholders’ liabilities are limited to their share capital investment.
- Tax Efficiency: Potential tax benefits compared to sole proprietorships.
- Professional Image: Often perceived as more credible by customers and investors.
This type of business structure is ideal for small businesses, startups, and those seeking external investment.
2. Sole Trader
A sole trader business is the simplest and most flexible structure, often chosen by freelancers and self-employed individuals.
Key characteristics include:
- Full Control: The owner has complete authority over business decisions.
- Unlimited Liability: The owner is personally responsible for all business debts.
- Simple Setup: Minimal paperwork and no need to register with Companies House, though HMRC registration is required.
- Taxation: Business profits are taxed as personal income.
This type of business structure suits individuals starting small-scale operations with low financial risk.
3. Limited Liability Partnership (LLP)
An LLP is a hybrid structure that combines the flexibility of a partnership with the limited liability protection of a company.
Key features include:
- Limited Liability: Partners’ personal assets are protected.
- Flexible Profit Sharing: Profits can be distributed among partners as agreed in the LLP agreement.
- Separate Legal Entity: The LLP can own assets and enter contracts independently.
LLPs are particularly popular among professional services firms, such as accountants, architects, and law practices.
4. Public Limited Company (PLC)
A PLC is a company whose shares can be publicly traded on the stock exchange.
Key features include:
- Minimum Capital Requirement: Must have at least £50,000 in share capital, with at least 25% paid up.
- Strict Regulations: Subject to more stringent compliance and reporting requirements.
- Public Investment: Can raise capital from the public by issuing shares.
This type of business structure is typically chosen by larger businesses planning to scale and attract significant investment.
5. Community Interest Company (CIC)
A CIC is a type of limited company designed for social enterprises that aim to benefit the community.
Key features include:
- Asset Lock: Ensures that assets and profits are used for community purposes.
- Limited Liability: Protects owners’ personal assets.
- Regulatory Oversight: Must submit an annual community interest report to the CIC regulator.
This structure is suitable for businesses with social or environmental goals.
6. Unlimited Company
An unlimited company has no limit on the liability of its members.
Key characteristics include:
- Personal Responsibility: Members are jointly and severally liable for the company's debts.
- Privacy: Financial accounts do not need to be filed with Companies House, ensuring confidentiality.
- Flexibility: Often used for niche or specific business purposes where liability is less of a concern.
READ ALSO: Best LLC Formation Services and Agencies in the USA
Benefits of Registering Your Business in the UK
- Access to a Thriving Economy: The UK ranks among the top global destinations for startups.
- Legal Protection: Operating as a registered company limits personal liability.
- Tax Advantages: Leverage corporate tax benefits, such as the Research and Development (R&D) Tax Credit.
You can consult with a tax advisor post-registration to optimize your tax strategy.
As a registered business owner in the UK, one of the advantages you have is that you can open a verified business account with any payment gateway provider.
So, for example, you can open a verified stripe account by using your business registration documents.
To show you how possible that is, I will be demonstrating how to open a verified stripe account using a UK company details.
How to Setup a Verified Stripe Account

After you have registered your business in the UK, you will receive all the necessary documents.
You’ll need to use the registered company details (especially tax ID) to setup a verified Stripe account, and also, you need to be careful while doing this because their bots are intelligent enough and conversant to detect any mistake you make.
Make sure that the information you use is the same as the one on your registered business documents as I’ll show you below.
Step 1. Visit: Stripe.com and open a new account.

Make sure that the Country you select is the same as the one on your LLP or LTD company documents, (In our case, it is the United Kingdom).
Enter your email address, your name and password. Then click on create account to proceed.
Step 2. Confirm Your Email and log in to Your Stripe Dashboard

Check your email and confirm your email using the link they’ll send to you. Once you have done that, you will be taken to the next page as shown below:

Click on Activate payments, and you’ll be taken to the next page where you will enter the details of your business as it is on the documents you got after registering your business.
Step 3. Enter Your Business Details for Verification
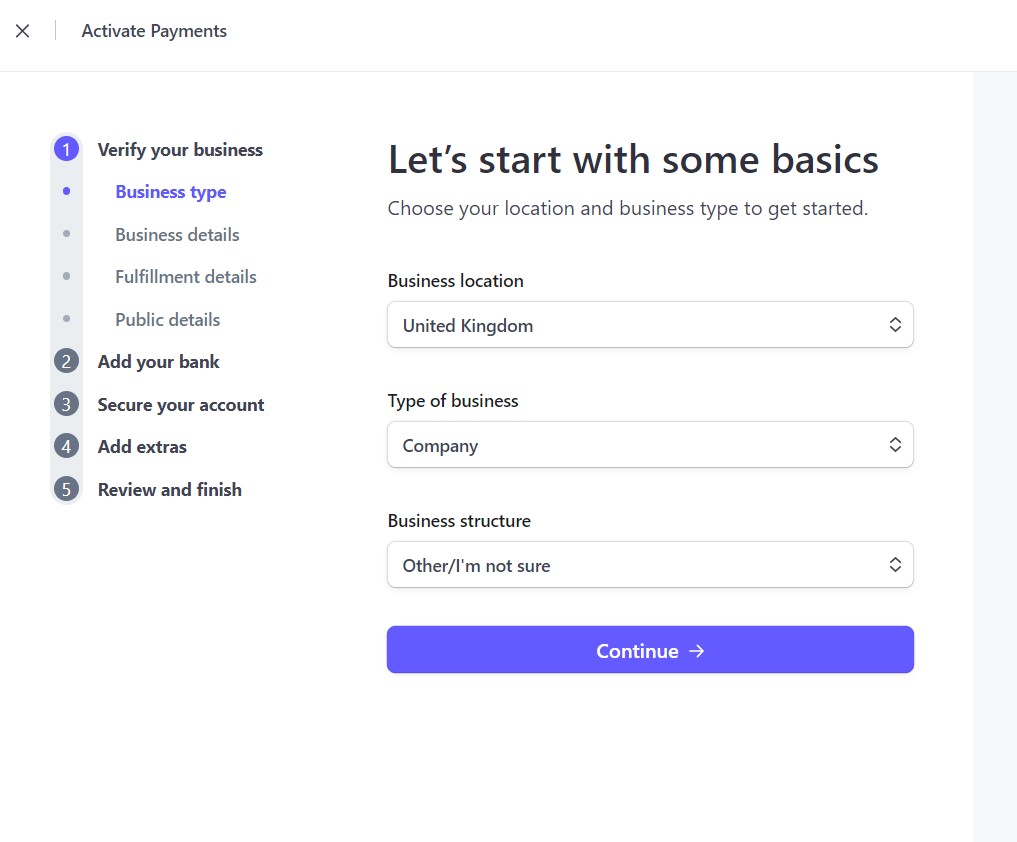
Select ‘United Kingdom’ as your business location, type of business should be ‘Company’, for business structure, select ‘other’ if your type of business is not listed.
Click on Continue to proceed to the next step.
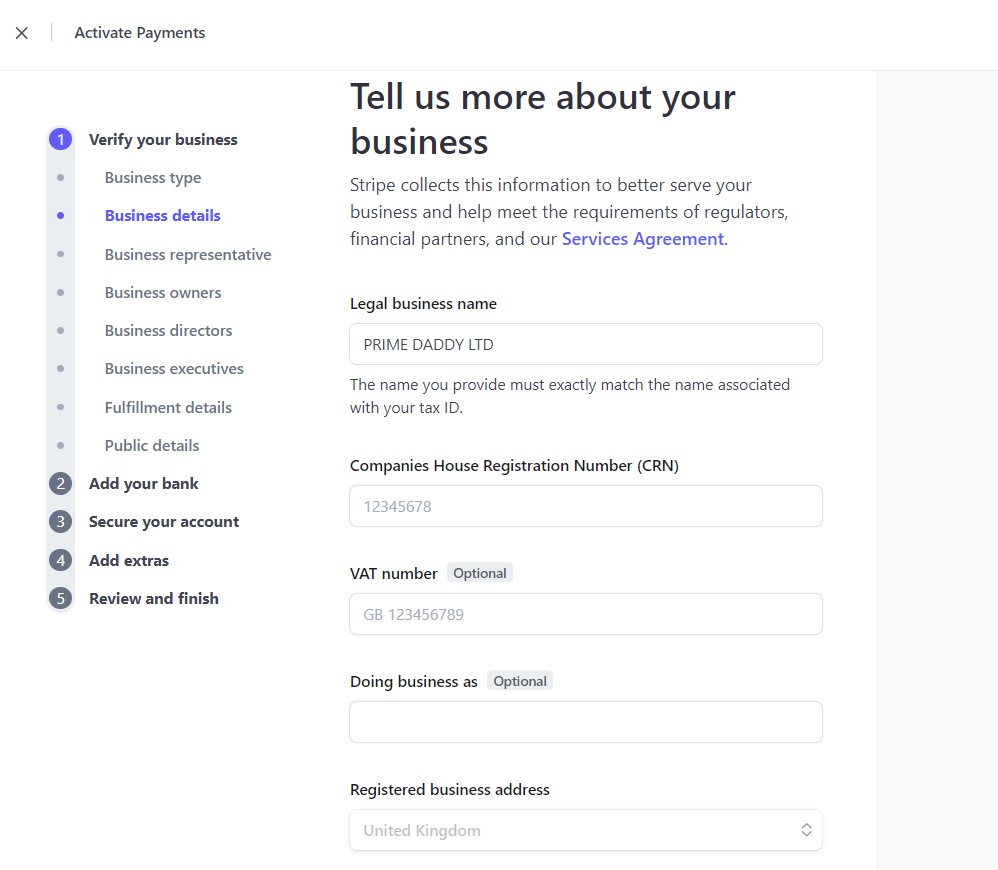
Your ‘Legal business name’ should be exactly the name on your company registration document.
Enter your CRN as stated in your registration documents.
‘VAT number’ may be optional now, but I’ll advise you enter it nevertheless because they still ask about it later when your business is fully operational. At least you won’t have to do it again.
One of the things I love about UK business registration agencies is that most of them give you a free business address, which is very essential in things such as this.
Make sure you enter the exact business address as it is on your company registration documents.
As for the ‘Business phone number‘ you can get one from Sonetel, Telusion or CallHippo.

Select your business industry, enter your business website and describe what your business do.
Once you are done with this, proceed to the next step.
Step 4. Verify your personal details (as the owner of the business)

This is where you enter your name, email address, job title, date of birth, etc.
At some point, you may be required to submit an ID to verify your identity. So make sure these information you are providing are the consistent with the ones on your ID card.
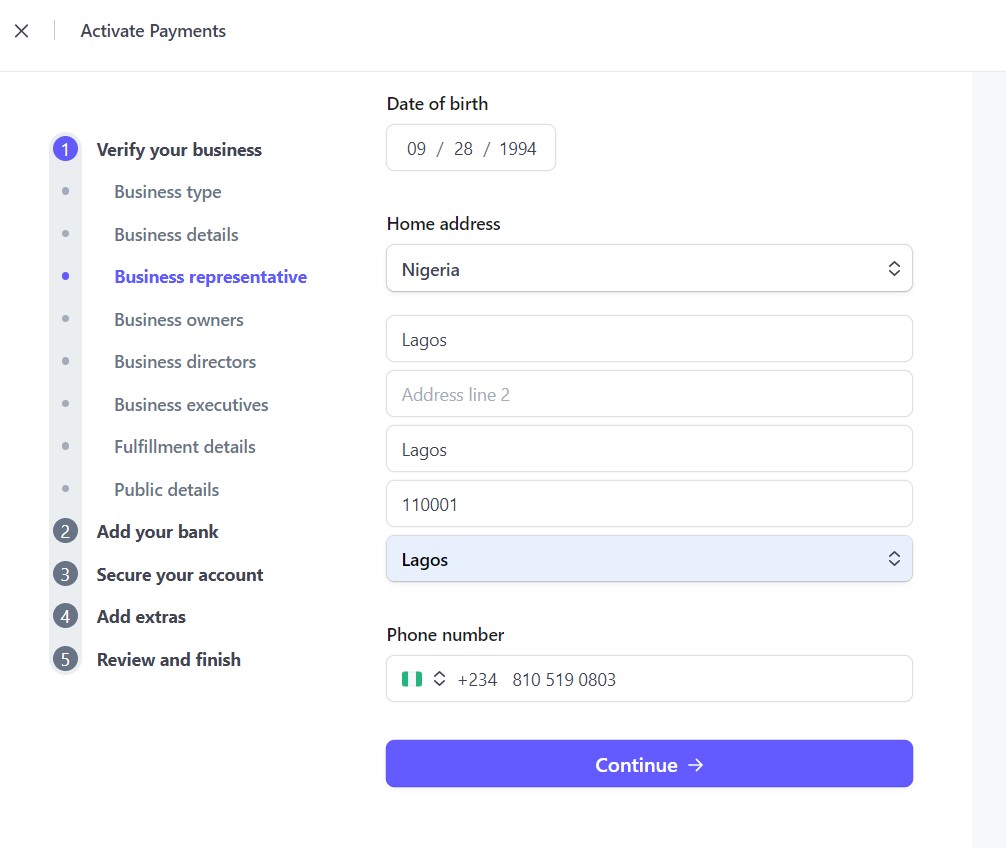
Select your country from the drop-down menu and then enter your home address as shown on your ID card. Remember this is very important.
For the ‘Phone number‘ option, you can select your country code and enter your local phone number. However, if you have a UK phone number, that will be perfect also.
Step 5. Select Business Representatives
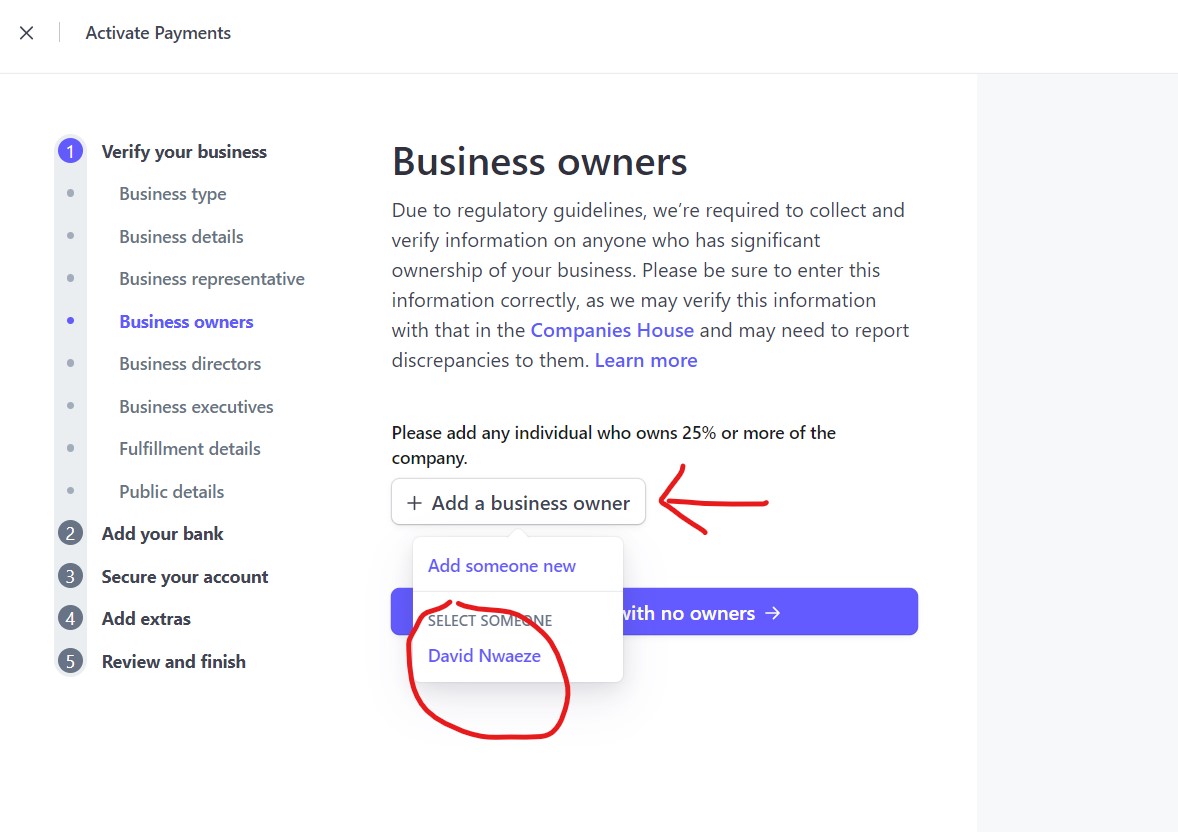
From the form you have just filled above, you use the details in the next sections such as ‘Business owners’, ‘Business directors’, and ‘Business executives’.
As highlighted in the image above, you can add someone new or select yourself as the owner.

As highlighted in the image above, you can add someone new as the business director, or you can add yourself as the business director.
Do the same thing for the ‘Business executives‘ section.
Step 6. Describe how you fulfill orders
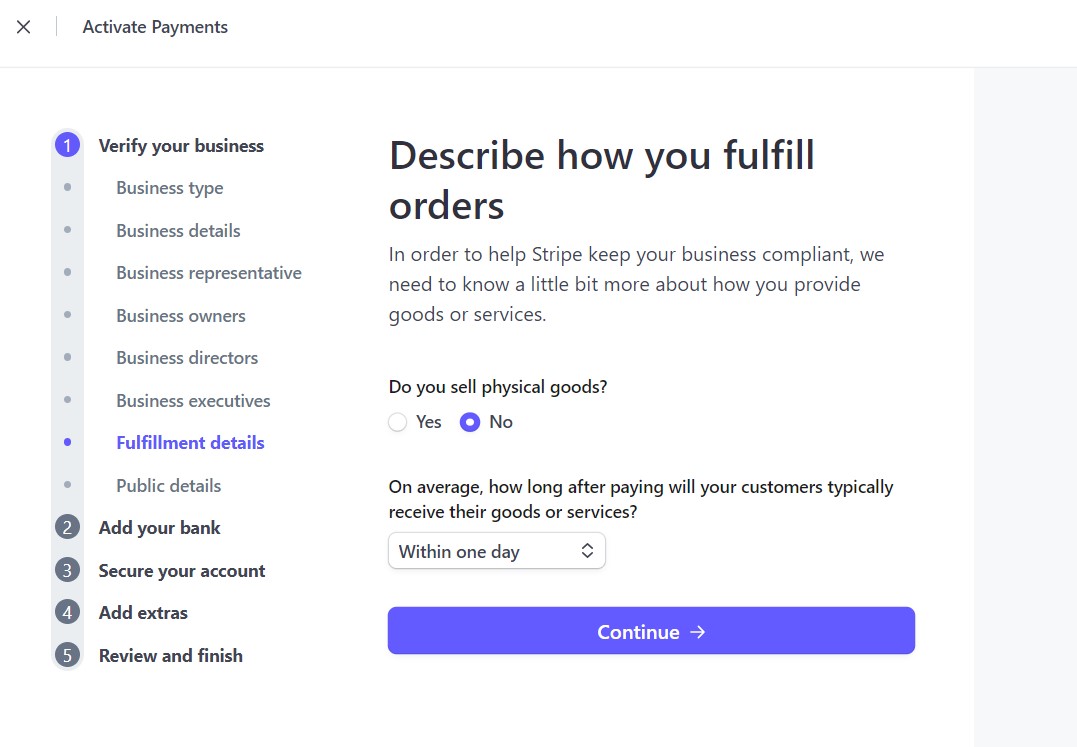
Select the options as they pertain to your business. You alone understand your business better.
Step 7. Customize how your business will look in public

When a customer makes a purchase on your website, this business information will be displayed, so make sure that your company is well represented by entering your Business name.
Step 8. Enter your bank details for quick payouts

If you do not have an account with the listed banks there, just click on the highlighted text as shown in the image above, and enter your virtual UK bank account details.
There are many great options, however, I will recommend for you the following:
- Visit www.wise.com
- Visit www.payoneer.com
- Open a Grey account using this step-by-step tutorial guide.
Any of these virtual banks will create a UK bank account for you free of charge and you can then enter your banking details into your stripe dashboard.
It’s very simple to do, all you need to do is follow the step-by-step instructions for each platform and you will be done in no time.
That is it, guys! Go ahead now, review, and submit your account application for verification. The Stripe team will review your application and verify you as long as your business details match the ones they find on your CRN.
That is why it’s very important to have your CRN ready before applying.
Congratulations! Your stripe business account is fully set up and you can now start receiving payments worldwide.
Looking for a Remote Job?
Register now to find Remote Jobs that are Paying from $1,000 - $5,000 Per Month...
Ready to Level Up Your Business Skills?
Join my online school, Online Income Academy, for more expert guides, tutorials, and strategies to help you build a successful business. Sign up today!

